Skip to primary navigation Skip to content Skip to footer

How to Write a Tour Description That Sells

Last updated on October 7, 2020
20 minute read
Key Takeaways

  • Elements to include, and exclude, in your tour descriptions
  • Using keyword & audience research to make the most impact
  • The role of storytelling and compelling language in tour descriptions
Categories

Skill Level

All Skill Levels
Actions

You know that the experiences you provide are fun, exciting, and memorable, but your potential customers don’t know that unless you write an impactful tour description that compels them to hit that book button. Writing a tour description is not just about listing out your itinerary and meeting location. The tour description is your opportunity to rank for keywords specific to your location and activities, give readers all the information they need to book, and boost your conversion rate.

This guide will cover how to set up your item in the Dashboard and write a flawless tour description that is sure to sell. 

Creating Items in the Dashboard

Before we dive into writing the description, let’s go over the most important elements when creating or updating an item in your FareHarbor Dashboard. You can learn more about items in our Help Center.

1. Craft a Brief, Descriptive Title 

Your title is one of the most important elements as it tells potential customers exactly what your tour or activity is. While it can be fun to use playful titles, such as naming a tour route after the company pet, these types of titles don’t give the customer the information they need – and they won’t help you rank for keywords related to your tour. Make sure to cover the basics, when choosing a title:

  • Explicitly state what the activity is – ex. a Kayak Tour, Food Tasting Tour, SUP Rental, or Surf Lesson.
  • Include the tour location – ex. North Shore Surf Lesson, or Downtown Denver Food Tasting Tour.

Titles structured in this way will help you rank for relevant keywords as well as ensure that your customers select the tour offering that best fits their needs. 

a sign on the side of a building

2. Add a Scannable Description That Answers Common Questions

Make it easy for people to find the information they need! When setting up your item, the description should be scannable and easy to read. Large blocks of text can feel overwhelming on a web page – guide the reader’s eye down the page and draw attention to important pieces of information by using:

  • Headings
  • Bullet points
  • Short paragraphs 

For example, use headings to draw attention to important content sections so users can easily identify the section relevant to their question. Common, useful headings for tours and activities include:

  • Tour Highlights
  • Trip Inclusions/Exclusions
  • Transportation Information

3. Include Photos & Action Shots

A great description goes a long way in selling a tour, but without images, it can be hard for potential customers to picture the tour. The power, and ultimate goal, of using compelling imagery is to allow people to imagine themselves in the experience you offer. Content with images gets 94% more views than content without them (Checkfront), so you really can’t skip the images.

Pro tip: Include at least three high-quality images of people enjoying your activities, showcasing the great location as well as the exciting action or state-of-the-art equipment that make your tour stand out.


a man jumping in the air

Screenshot of booking options by length

4. Keep Your Booking Flow Simple 

Once your items are set up, it’s important to categorize them in a logical way that makes it easier for customers to find the activity they’re looking for and avoid decision fatigue. You can read up on booking flows in our Help Center.

One easy way to simplify your flow is to combine activities that are mostly the same but that might have one small difference. For example, maybe you offer kayak rentals – if you offer different rental lengths for your equipment rentals, but all the other details are identical, it makes sense to create a single item (for kayak rentals) and then provide rental length options in the book form.

Writing Activity Descriptions 

Whether you’re starting from scratch, adding a new item, or updating your existing descriptions, follow these tips to optimize your activities for SEO and conversions. 

1. Conduct Keyword Research 

Before you start writing, conduct keyword research to discover the types of queries searchers use to find the types of activities you offer. Make sure to include keywords naturally in a way that doesn’t disrupt the description flow, and avoid keyword stuffing.

Pro tip: If you are unsure of your use of keywords, go ahead and read the sentence out loud top yourself and if there are a lot of redundancies or it sounds “off” to your ear, cut something out. 

It’s not enough to simply add keywords to a page to help it rank –  the viewer’s search intent is critical to consider. For example, if a user is searching for “best spots to snorkel in Hawaii,” they’re likely still in the research phase of their travel planning and are not yet ready to book a tour. When conducting a search for this particular query the SERP results return mainly numbered lists. Given this experiment, we can conclude that including these types of keywords in your activity page is not likely to help you rank because it’s not the type of content that meets the search intent for that query. Instead, aim for keywords like “snorkeling tours in the North Shore.” A user searching for this phrase already knows the “what” and “where” for their desired activity and your activity page is more likely to meet their search intent and have a better chance of ranking. This is all a part of the traveler’s booking journey, which we outlined in more detail in this Compass guide

a close up of a logo2. Write for a Specific Audience 

A successful marketing strategy boils down to crafting the right message for the right audience. Ask yourself:

  • Who is this tour or activity intended for?
  • What will be compelling to them?
  • What sets you apart from your competition?

Pro tip: Rely on past experience and tour attendance to begin to understand the target audience for each of your offerings – and keep them in mind when writing your descriptions.

Consider the kinds of questions your past guests have asked, and make sure to answer them in your description. For example, a high-intensity tour that is geared toward adventurers should use language that speaks to the excitement and adrenaline of the experience. A family-friendly tour or an activity geared specifically toward kids should answer the parents’ questions – such as ideal age or any age limitations, what kids will learn, as well as any safety precautions or waivers required. 

3. Start with the Most Important Information

Most users will not read the entire tour description, so your first couple of sentences should cover as much important information as possible. Start your description with a brief summary that hits on all the highlights of your tour, then go into more detail in the following paragraphs. In journalism, this is known as the inverted pyramid, where your first paragraph offers all the main information the reader will need, and subsequent paragraphs drill down into more detailed information or information that may not be as relevant to all users.

Let’s take a look at some examples of the first sentence in a tour description. 

“Our tour begins at the marina, where you board the boat and meet the crew before we embark on our private boat tour.”

You might be tempted to describe your tour chronologically, starting with the meeting point, but this is not the most exciting part of your tour, and if a reader only skims the first sentences, it’s unlikely to grab their attention. A better description would be:

“Discover all the most beautiful views of Hilton Head on this private boat tour that shows you the beaches, wildlife, and landmarks that make this one of the most breathtaking areas in the U.S.”

This first sentence encompasses all the major selling points of this tour – it is:

  • Private
  • Scenic
  • Includes all the things tourists want to see, such as unique wildlife and significant landmarks

Once the reader is engaged, then it’s time to dive into more details about your tour in the following paragraphs.  

4. Explicitly Call Out Inclusions, Exclusions, and Logistics

screenshot of tour inclusions and details listed in bullet pointsFollowing the tour’s description, take the time to expand on tour details and answer common questions, such as:

  • What’s included in the tour
  • What guests can expect to see and learn on the tour 
  • Logistical details
  • And more

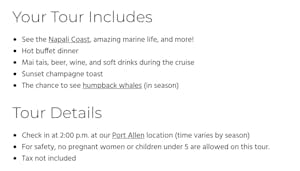
A big block of text is unpleasant to the eye, so make sure you break up this information using bullet points, sub-headings, and sectioned content. For example, after you have provided essential information about the tour, then list out logistical information using bullet points (see Tour Details in the above example). 

screenshot of sectioned content blocks or accordion contentPro tip: If you offer multi-day tours where you need to provide customers with logistical information related to things like accommodations, meals, and daily itineraries, use sectioned content blocks (also known as accordions), which allow the user to expand the information they’re interested in reading. This helps you keep the activity page clean with just the main information in the body text. 

5. Tell a Compelling Story

As a tour guide or operator, chances are you’re probably a great storyteller – so put these skills to use when writing your tour description! Instead of only focusing on logistics or the itinerary, tell the tale of what the tour experience will be like. For example, if you offer a relaxing boat tour, use language that evokes lounging on the deck, taking a refreshing swim, and soaking in the views. If you offer a challenging canyoning tour, talk about how your guests’ adrenaline will be pumping as they rappel, cliff jump, and more.

If you offer a food tour that visits local spots, don’t just tell readers they will “taste local food”, but rather “delight in the local flavors and discover what makes this city unique through its food.” 

Pro tip: Use the second person (“you” and “your”) to put the reader right into the action – imagining themselves in the experience. Avoid using cliches or overused language about tours. Instead, get specific and descriptive, using language that speaks to what’s unique about your location and your experiences.

6. Highlight What Makes Your Tour Different

It’s likely that potential customers are considering multiple companies before they decide to book their tour, so use your description to highlight what makes your tour different.

  • Do you go to an exclusive location?
  • Do you go out early to beat the crowds?
  • Is your vessel the most comfortable?
  • Do you offer small groups?
  • Do you include a delicious lunch with local ingredients?
  • Are your tour guides professionally trained or really knowledgeable in their field?

These are all things potential customers will take into account, so be sure to call out all the great things that help your company stand out among the rest. 

a close up of a logo7. Leave Some Surprises 

You must provide readers with enough information on what to expect on your tour, but you don’t need to divulge all the tricks you have up your sleeve. Leave some surprises for the tour itself!

For example, if you offer a walking tour of the city, let customers know the major can’t miss attractions you will be sure to visit with them, but don’t divulge your full route or secret spots. Instead of giving a stop-by-stop description of your tour, give an overview that includes some of the highlights, and leave readers wanting more by telling them that you’ll take them to hidden gems and off-the-beaten-path stops along the way. Not only does this allow for pleasant surprises along the way, but if you are forced to re-route for any reason, your guests will be none-the-wiser.

8. Length

When it comes to the ideal description length, the short answer is there isn’t one. While we’ve heard in the past that a page needs at least 250 words to rank, Google executives have since explained that the algorithm focuses more on content quality and relevance than length. Stuffing your content full of fluff to hit a certain word count will not help you rank in search results. What will help is writing quality content that answers all the user’s questions and meets their search intent. So rather than worrying about the word count, just be sure to provide all the important information in a concise manner. 

Pro tip: Don’t overdo it when it comes to length. Users spend an average of 5.59 seconds looking at a website’s written content (Sweor), so it’s unrealistic to think they’re willing to spend an extended amount of time reading long paragraphs of content. Going back to tip #3, focus on the most important information at the top, and avoid turning potential customers away with overwhelming blocks of text. 

a close up of a logo9. Use Internal Links 

Make it easy for users to navigate between your activities by using internal links (links that point to other pages on your website). For example, if you offer a meat-heavy food tour that can’t easily be adapted to vegetarians, you can include a link in your description that takes users to a more veggie-friendly tour that they might be interested in instead. 

10. Proofread

Once you’re done writing your amazing tour description, you don’t want to be derailed by pesky typos. Take the time to proofread your work to catch any mistakes and publish a polished description. You can use a free browser extension like Grammarly to help you catch any errors. 

If you’ve followed these tips, you’re well on your way to increasing bookings on your activities. If you’ve had the same descriptions for years now, it could be time to look them over and see if they could use a refresh, whether it’s adding new content, cutting down content that is too long, or updating your keywords. For more content tips, watch our webinar on creating content to boost traffic or read our guide to writing content for readers and search engines alike

Related Guides