- 15 minute read
- Digital Marketing
Video Marketing Software, Equipment & Strategies for Tour & Activity Operators
All Skill Levels
Get a behind-the-scenes-look into FareHarbor's 2024 season
YouTube is a useful medium to connect with your audience and show off what makes your tours and activities worth booking. The second-most visited website after Google, YouTube is a search engine unto itself, giving you new opportunities for additional traffic, audience engagement, and unique content.
Video allows you to promote your tours and activities in an entirely new way. Ready to experiment with video marketing on YouTube? Keep reading to learn how to set up your YouTube channel for success.
 Define Your Goals
Before you start brainstorming video ideas, think about your main reason for posting them in the first place. Are you trying to better engage with your audience? Use videos of your tours and activities to increase conversions? Reach a wider net of potential bookers? Depending on your goals, you may want to consider making a brand video, a customer testimonial video, or a video of a recent event.
It’s also essential to have a solid understanding of who your audience is, as this will help you define your goals for your YouTube channel. Learn more about various video types and how to create videos for your target audience in our guide to promoting your tours and activities with video.
 Prepare to Shoot Videos
There’s a lot of behind-the-scenes work that goes into making creative videos for your YouTube channel, like choosing the equipment you’ll use to film the video, finding the best editing software to suit your needs, writing a script, formatting the final product, and more. It can feel a little overwhelming, but once you get the hang of the process, you’ll be making engaging videos in no time. We’ve put together a guide on video marketing strategies and platforms to help you get started.
 Create Your YouTube Channel
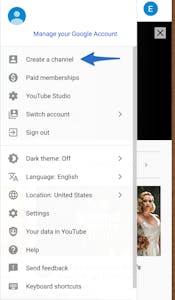
To create your YouTube channel, you’ll need to use a Google account. Use the one associated with your business (you’ve likely used it to set up Google My Business, Google Analytics, and other tools). Once you’re logged in, click on your profile icon in the top right corner and select “Create a channel.”
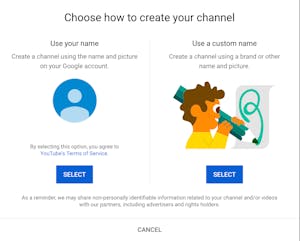
Choose the “Use a custom name” option and enter the name you’d like to use for your YouTube channel. It’s best to use your company name, but you can change this name at any time after creating the channel.
Next, fill in additional information such as a channel description and social media links, and click “Customize Channel” to add photos and other channel art to help viewers recognize the visual identity of your brand.
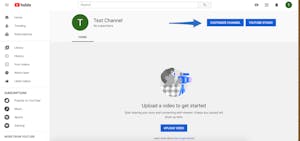
Include your main logo, brand colors, and any other imagery you use on your website. It’s important to keep these visual aspects uniform across web platforms so that viewers can easily recognize and remember your brand. The icon image is a great place to use a brand logo that works well at smaller resolutions. For the banner image, similar to the cover photo on Facebook, choose an image that encapsulates your brand and helps audiences engage with your content.

 Create a Channel Trailer
 The channel trailer serves as a preview for the rest of your content, allowing you to showcase your brand and encourage visitors to subscribe to your YouTube channel. Think of the channel trailer like a movie trailer. It should be short and captivating with the goal of making people want to watch more of your videos. Most channel trailers are between 30 seconds and one minute in length.
When brainstorming ideas for your channel trailer, assume that your viewers are people who don’t know much (or anything!) about your business. The video should welcome viewers while introducing your business and telling people what your YouTube channel is all about. Go into storytelling mode to educate viewers on how your business got started. Try to make your personality, brand voice, and style apparent throughout the video.
Include your logo or tagline early on so that your business name and branding sticks with viewers. It’s also a best practice to start with some kind of hook to captivate viewers and keep them engaged with the rest of the video. For example, a zipline business could start with a shot from the point of view of a guest as they speed down the line, while the channel trailer for a zoo or animal-related business could show a clip of a cute animal doing something funny. Clue viewers into what kind of content your channel will post in the future so they know what to look forward to.
Finally, end with a call to action asking viewers to perform an action to keep them engaged with your brand. This might be something along the lines of “Check out our videos to learn more,” “Subscribe today for news and updates,” or “If you like this channel, don’t forget to follow us on social media.” Remember, if you don’t end with a CTA, viewers may just leave your video without taking an action.
Check out this great example of a channel trailer from SciShow for inspiration.
Once your YouTube channel is set up, you can start shooting and uploading videos that show your customers what your business is all about! The next step is to learn what types of videos are resonating with your audience and dive deeper into what the platform offers you as a creator. Check out our video optimization checklist!