- 45 minutes
- Dashboard & FareHarbor
Data Unleashed: Elevating Your Business Through Reporting
Intermediate,
Advanced
Join hundreds of other operators and REGISTER NOW for Spark 2024 New Orleans October 13-15th!


Without reporting and data collection, it’s hard to know which aspects of your business are performing well or what needs improvement. As a client, you have access to FareHarbor’s inherent, powerful reporting tools.
From financial information to customer insights, we’ve got a slew of report options that enable you to learn about and analyze different parts of your business.
This guide will cover four recent reporting updates that will help you to make better informed decisions that can increase your revenue and your overall understanding of your business.

Online rebooking allows customers to modify their reservation online, saving you time and keeping your phone from ringing off the hook. And, with one of our latest updates, you are now able to run a report that differentiates new bookings from those that were rebooked.
This information is critical to learning how you are retaining revenue when customers need to cancel and gives a more holistic view into customer booking behavior.
Refund data can help you understand customer satisfaction, the performance of your business and staff, and more. This new filter, which lives under the Sales report, will provide insight into how often you are issuing refunds so you can uncover actionable insights for your business.

The Refund Reserve allows you to hold money in FareHarbor to use specifically for refunds. It enables you to issue refunds as quickly as possible which increases efficiency for you and leads to happy customers.
We’ve just made it easier for you to view and report on your Refund Reserves. This new tab shows your balance and historical transfers at a glance.
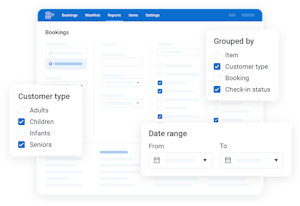
Understanding your customers is critical to your business’s success — and the more granular you can get, the better. This last new reporting update provides better insights into your in-person sales, allowing you to segment and analyze how your in-person payments are processed.
We’re always looking for new ways to improve your business operations. For more information on FareHarbor’s reporting capabilities, catch up with a few additional resources below.