Skip to primary navigation Skip to content Skip to footer

Do It Yourself: Master 3 Essential Dashboard Actions

Last updated on April 13, 2022
8 minute read
Key Takeaways

  • To fully take advantage of your Dashboard, learn these DIY items you can quickly accomplish.
  • Add users, update availabilities, and manage an item listing on your own.
Categories

Skill Level

Beginner
Actions

Whether you need a quick reminder on how to use the availability updater or want to train a new employee on editing an item listing, it’s always a good time to refresh your memory on the most essential actions in your FareHarbor Dashboard.

With these quick tasks up your sleeve, you can save yourself time and make easy updates to your Dashboard on your own schedule.

Get started with these do-it-yourself Dashboard actions and explore the related guides at the bottom of the page to take command of your bookings, pricing, and more.
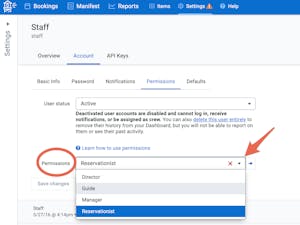
shapeAdd Users

Need to get a new staff member up to speed? Start by adding them as a Dashboard user so they’re able to take reservations, update bookings, and more. You can select their permission group to better control exactly what they’re able to do within your Dashboard, like access reports or check in customers.

graphical user interface, text, application, email

  • Explore the different permission groups to determine which one you want to assign to your new user. Consider their role in your business and what you want them to have access to.
  • Navigate to Settings > Users & Permissions from the top toolbar.
  • Click “New user”.
  • Enter the user’s name, give them a username, and add an email and password.
  • Choose a permission group to assign the user. 
  • Check the box next to “User agrees to the FareHarbor terms of service”.
  • You may upload a picture, but this is optional.
  • Click “Create user”.

shape
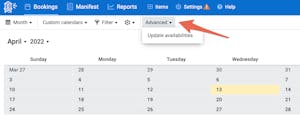
Use the Availability Updater

Sometimes you need to make a quick change to multiple availabilities and items, like when you want to switch a tour guide to a different schedule or add an automated message to customers. You can make these changes in bulk using the availability updater to save time and make your Dashboard more efficient.

table

  • Open the availability updater (accessible from two places).
    • 1. From the Bookings section of the Dashboard, select Update availabilities under Advanced in the toolbar.
    • 2. From the Items section of the Dashboard, select the item you want to update, go to the item Calendar, then click Update availabilities from the toolbar at the top. 
  •  Select the availability setting you want to update in the left hand column (labeled “Change”).
  • Choose what you want to change, such as headline, length, or start time.
  • In the second column, select which availabilities you want to change. Input the dates, select which items to update, and use the additional filters to narrow down the number of availabilities you’re updating.
    • Pro tip: Depending on what you choose in the first column, the availability updater will show suggested filters to help you select the relevant bookings.
  • In the third column of the updater, indicate the new setting for the availabilities you selected. 
  • Click “Preview changes” at the bottom of the updater to see how many availabilities will change and make sure everything looks correct. 
  • Click “Complete update”.
  • Visit this help page to see a video of the availability updater in action.

shape
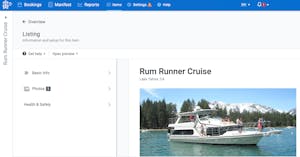
Manage an Item’s Listing

Item listings are the face of your tour or activity, so don’t neglect them! Not only does the item listing reflect how it appears to online customers, it also includes essential information like the tour description, location, and photos. If you ever need to update these elements, managing an item listing is an easy do-it-yourself task!

graphical user interface, application

  • Navigate to the item you want to edit in your Dashboard.
  • Go to that item’s Settings and select Listing from the menu to edit or preview the listing to see what it will look like to your customers. 
  • Select which section to edit from the three options on the left: Basic Info, Photos, and Health & Safety.
  • Make your desired updates and click “Save changes” at the bottom. You will see a preview of your edits after saving.
  • Learn more about item listings here.

These three Dashboard tasks are important do-it-yourself items that you should become familiar with. Not only will these make you more comfortable with your Dashboard, but they’ll also save you time and allow you to make important changes with just a few clicks. 

Looking for more Dashboard essentials? We also recommend brushing up on setting up custom fields to better optimize your book form, and customer types to define the types of people and options that can be booked for your activities.

Related Guides